If you are a beginner first visit the following link and start with the first part.
http://shameerdw.blogspot.com/2020/12/excel-and-sql-server-integration.html
In this blog we are going to discuss about how to load multiple
EXCEL files with multiple sheets.
To do this I’m using SQL Server 2016, Visual Studio 2015,
SSDT and SSMS to store the tables.
Let’s say that we have two excel files with multiple sheets.
Marks_2019 have 3 sheets.


Marks_2020 have 2 sheets.


As you can see the first two rows of all the sheets are
empty.
We need to load only the sheets which have subject marks into
a single destination table.
First we create a destination table in the SSMS where I named it as Marks and which has ID, Name, Year, Sheet name and Marks as columns.
Then we have to create a SSIS solution in Visual Studio.
After that we have to create following variables.

Then we have to create the connection managers.
First we create the connection manager which is going to
loop through the sheets. We name it as “ExcelLoop”.
We need to add an ADO.Net connection.
Then configure it as below.


Then click on Test Connection and if it is success click OK.
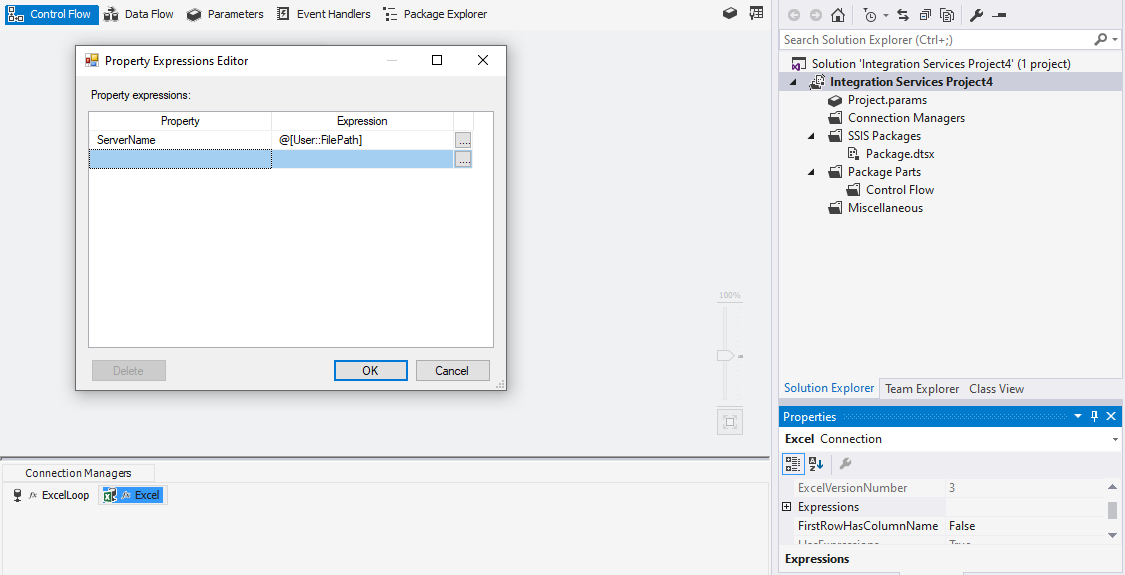
Then rename the connection manager as “ExcelLoop”. Then right-click the connection manager and select properties. After that click the expression and configure it as below and click OK.

Next create another connection manager to access the excel
sheets. We name it as “Excel”.
We need to add an Excel connection.
Then configure it as below and click OK.

We need to untick the First row has column names because in
the excel sheets we going to load first two rows are empty and column names are
given in the third row.
Then name the connection manager as “Excel” and go to
expression in properties and configure it as below.
Then add a for each loop container inside another for each loop container and add a script task and data flow task and connect them inside the inner for each loop container as given below.
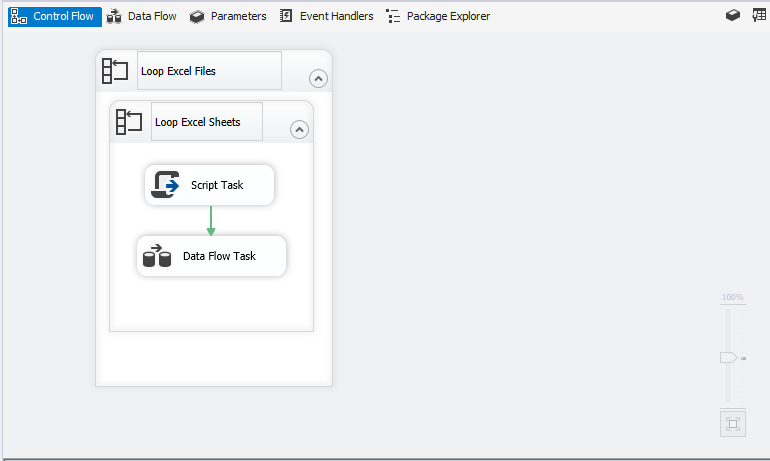
Now we’ll configure the “Loop Excel Files” For each loop container.


Then we’ll configure the “Loop Excel Sheets” For each loop container.


Then we’ll configure the script task. Double-click and select the Edit Script and add following C# code in the main.

Next configure the connector which joins the script task and data flow task as below.

Finally we configure the data flow task.
Add following components to the data flow task.

When adding the Script component select Transformation as
Component Type.

We’ll configure the Excel source first.


Then we’ll configure the script component to avoid first two rows.

Then go to script and Edit Script and add following C# code in the main.

Then we’ll configure the Conditional Split component.

When connecting the Conditional split to the Derived column tool select case 1.

To get the Sheet name we need to configure the Derived
column tool as below.

Then create a connection manager to the destination database and configure the OLE DB Destination.


Now we can execute the package.

The final output will look like below in the destination table.

This is the end of the 2nd Part of Excel and SQL Server Integration Service.